
IoTit Flashing tool
IoTit (written in Golang) is an open source command-line utility for flashing (initializing) IoT devices.
The easiest way to get IoTit is to go to the Releases tab in this repository and download a precompiled binary that matches your OS and architecture.
If you are not sure about your computer details, take a look at this article
For other intallation methods see the installation section below.
IoTit contains a VirtualBox wrapper go-virtualbox, so it can only run on an OS that allows installation of VirtualBox.
SUPPORTED DEVICES
- BeagleBone
- Intel Edison
- NanoPi NEO
- Raspberry Pi
- Toradex Colibri iMX6
- ASUS Tinker Board
- ESP-32
- ESP-8266
REQUIREMENTS
golang >= 1.8
virtualbox >= 5.0
INSTALLATION
OSX HOMEBREW
On macOS you can install IoTit from homebrew:
brew tap xshellinc/iotit && brew install iotit
Note: IoTit requires VM VirtualBox and Extension Pack to be installed on your machine.
WINDOWS
NOTE Windows build is still experimental and you may experience problems flashing on windows 7
At this point we officaily do not support 32 bit windows (all versions)
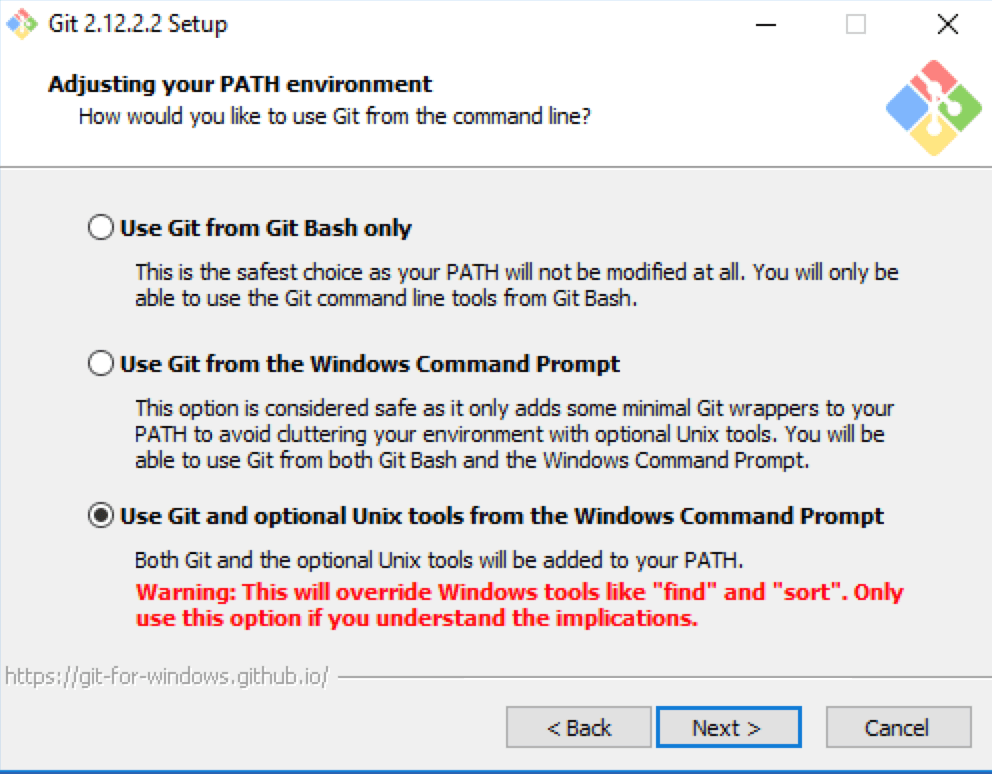
You will need to install git-for-windows
Upon installing, you will need to add both git and Unix tools to the system PATH example screenshot
Windows PowerShell or CMD should be run as Administrator for IoTit to be able to write on external drives.
When flashing Intel® Edison make sure to provide external power supply.
Flashing Intel® Edison under Windows will render it’s usb-ethernet adapter unusable under macOS and vice versa source.
USB-to-Serial drivers
- Espressif ESP8266 Lolin/NodeMCU CH340 [for macOS 10.12 take it here]
- Espressif ESP32 CP210x
Building from source
If you want to build binaries yourself, then follow the regular recommendations for go build
Note: Install all requirements before trying to build it on your local workstation:
go get ./...
Note: Although it is not required we recommend to install ssh-copy-id for flashing edison.
DEVELOPMENT ENVIRONMENT
To build and run with debug log use:
./build.sh && ./iotit
COMMANDS
To see available commands launch iotit help
NAME:
   iotit - Flashing Tool for IoT devices used by Isaax Cloud

USAGE:
   iotit [global options] command [command options] [arguments...]

COMMANDS:
     flash, f       Flash image to the device
     install, i     Install to global app environment
     uninstall, rm  Uninstall iotit
     update, u      Self-update
     log, l         Show log file location
     help, h        Shows a list of commands or help for one command

GLOBAL OPTIONS:
   --help, -h     show help
   --version, -v  print the version
For example here are the flash command flags:
$ iotit flash --help
NAME:
   iotit flash - Flash image to the device

USAGE:
   iotit flash [command options] [device image]

OPTIONS:
   --quiet, --unattended, -q  Suppress questions and assume default answers
   --disk value, -d value     External disk or usb device
   --port value, -p value     Serial port for connected device. If set to 'auto' first port will be used.
VIRTUALBOX
During installation user can choose default virtualbox specs
Alternatively user can create their own vbox spec by choosing Create new virtual machine.
This will create a spec file with a name of virtualbox and specs such as memory, cpu, vram etc,
which is applied to iotit-box
To delete a custom virtual box preset, go to the iotit folder on your machine on macOS it is at/Users/{user}/.iotit. Open the file iotit-vbox.json in a text editor and delete the entry of the preset you want to remove. Entries are in the following form:
{
  "name": "test_vbox",
  "uuid": "c1fd7bca-4532-4796-b862-7c16be2d07f4",
  "template": "iotit-box",
  "device": "raspberry-pi",
  "description": "it is a test vbox",
  "option": {
    "cpu": 1,
    "memory": 512,
    "usb": {
      "vc": false,
      "type": {
        "2.0": false,
        "3.0": false
      }
    }
  },
  "SSH": {
    "SSH": {
      "User": "root",
      "Server": "localhost",
      "Key": "",
      "Port": "2222",
      "Password": ""
    },
    "Sudo": false,
    "SudoPass": ""
  }
}
INTERNALS
$HOME/.iotit - a directory containing iotit related files
$HOME/.iotit/mapping.json - a file containing different device types and urls of images to be downloaded
$HOME/.iotit/virtualbox/{version}/iotit-box.zip - a packed virtual box image
$HOME/.iotit/images/{device}/{image_pack} - packed images grouped by device names
IoTit uses x64 virtualbox in order to flash and configure devices,
because it allows to work with linux partitions and reduces installation requirements
across different OSes
Currently 4 workflows are supported:
1 Edison:
- copy installation files into virtualbox
- run flashall.sh - to reflash edison
- run edison_configure - to configure
2 SD:
- copy installation files into virtualbox
- mount the image partition into loop via
losetupandmount - write configuration files into the image
- write image into sd-card via
ddordiskutilon macos
3 ESP-32/8266:
- upload firmware and bootloader binaries over serial connection
- configure module parameters using serial connection
4 Toradex Colibri
- copy installation files into virtualbox
- run update.sh and create img files
- copy image files to SD card
- connect to colibri module via serial
- run update to flash linux to internal eMMC
VirtualBox uses alpine virtualbox image with additional software installed
bash
libusb-dev
xz
util-linux
dfu-util
and for Toradex:
dosfstools
parted
sudo
e2fsprogs-extra
coreutils
libattr
zip
Edison device is additionally mapped to the usb ports
Intel Edison [0310]
Intel USB download gadget [9999]
CUSTOM BOARDS FLASHING:
Provide image url or path to flash it on SD card.
STRUCTURE OF mapping.json:
Example:
"Devices":
	[
	  {
	    "Name":"device_name_or_category",
        "Alias":"short_name",
	    "Sub":[
	      {
	        "Name":"device_name_or_sub_category",
            "Alias":"short_name"
	        "Sub":[],
	        "Images:[]
	      }
	    ],
	    "Images":[
	      {
	        "Url":"url",
            "Title":"url_title",
            "Alias":"short_name"
	      }
	    ]
	  }
	]
If you do not specify any images for sub categeory it will choose whatever you have specified in the global image section. If you have more than one image in any image section you will be presented with a list when flashing.
Structure:
DeviceMapping struct {
    Name      string
	Alias     string
    Sub       []DeviceMapping
    []Images  struct {
        Url    url
        Title  string
    }
}
Algorithm:
has a tree like structure -
devices are listed using Name field, then devices are listed within Sub array and etc.
If a Sub device doesn’t have any image, then parent’s images are used instead.